Install Ubuntu on External Disk
Sometimes it can be useful to have an external HDD or SSD with a familiar environment installed. With such a device it’s possible to check the computer from eBay for GPU or memory faults, restore a primary OS of the workstation after an unsuccessful software update or just work on another PC with a familiar OS without any modifications of any software on this machine.
I use Ubuntu 20.04 as a primary OS, that is why in this article, I’ll explain how to install it on an external drive.
First of all, there is an official tutorial about how to make a bootable USB stick. It’s a useful solution when the main goal is the installation of Ubuntu. It is also possible to try the system before the installation. Unfortunately, all files that the user had created during the demo session will be lost after a reboot.
This problem can be partially solved by the persistence file with tools like Rufus or mkusb. All modifications of the file system like a file creation or installation of a program will be saved into the overlay file.
There are several limitations of such an approach: it’s impossible to modify the kernel, install hardware drivers or perform major system updates because the overlay file is mounted after the kernel is loaded. However, users can install or update most applications, so the can always use the latest version of the web browser or office suite.
I want to work around these limitations and prepare an environment that will be identical to my desktop. It can be achieved by installing Ubuntu on an external drive.
I have an Ubuntu desktop and external Seagate HDD with a USB 3 interface.
First of all install VirtualBox:
sudo apt install virtualbox
Only members of the disk group can perform different actions with USB disks without sudo, so
execute such command:
sudo gpasswd -a `whoami` disk
After this command re-login or restart the computer to apply changes.
Connect the external drive and take a look on the messages from /var/log/syslog (it’s also
possible to use glome-logs GUI tool to explore these logs):
tail -30 /var/log/syslog
There should be something like:
usb 1-11: new high-speed USB device number 8 using xhci_hcd
usb 1-11: New USB device found, idVendor=0bc2, idProduct=231a, bcdDevice= 7.08
usb 1-11: New USB device strings: Mfr=1, Product=2, SerialNumber=3
sd 5:0:0:0: [sda] Attached SCSI disk
It means that the external HDD is attached as a /dev/sda device. Alternatively, there is the same
info in the gnome-disks tool:

Before continuing unmount any mounted partitions of the external drive with a command like
sudo umount /dev/sda1. It’s better to avoid using GUI because it can cause errors like:
BoxManage: error: Cannot open the raw disk '/dev/sda': VERR_MEDIA_NOT_PRESENT
VBoxManage: error: The raw disk vmdk file was not created
on further steps.
By default, VirtualBox hard drive is just a file but it’s possible to connect a block device as a hard drive. So the idea is to connect the external HDD as a hard drive to VirtualBox and install Ubuntu on it in the virtual machine (VM).
To install Ubuntu on the external drive, create a virtual hard disk image from the existing contents of a physical drive so VirtualBox can mount this disk to the VM:
- Create virtual hard drive with the command:
VBoxManage internalcommands createrawvmdk -filename ~/sda.vmdk -rawdisk /dev/sdawhere/dev/sdais the device name from the syslog. - Open VirtualBox and press
ctrl-dto show Virtual Media Manager. - Press “Add” and find the file from step 1.
Speed of the system can be limited by the speed of an external drive: the portable system can be a lot slower than the system with an internal m.2 SSD.
UPDATE: sometimes it’s impossible to boot OS after installation on raw disk.
To fix this issue:
- Install VirtualBox Extension Pack.
- Attach external HDD as a USB device.
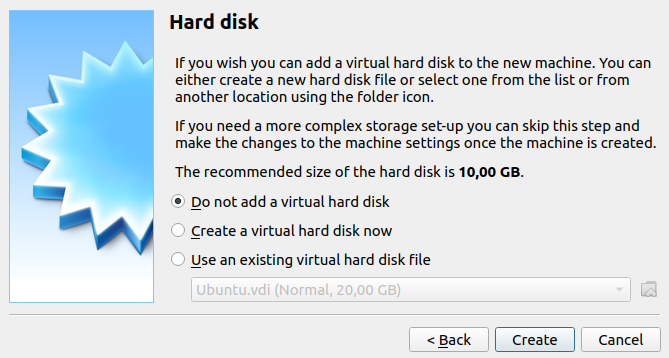
Create an Ubuntu VM without a hard drive:

Open VM settings with Ctrl-S and add previously created hard drive sda.vmdk in the Storage
section.
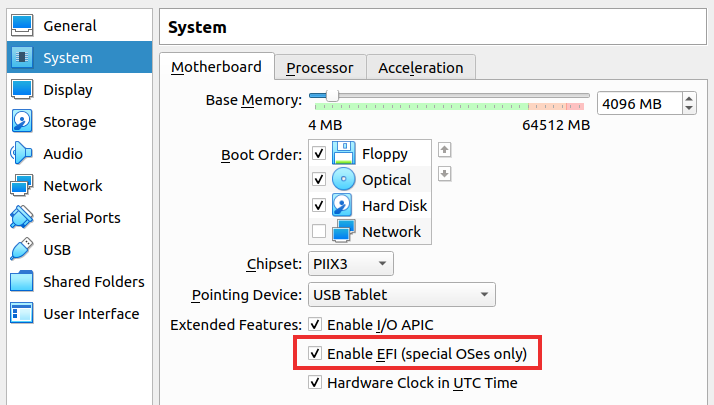
The majority of modern computers use UEFI that requires a special disk partition to boot. Ubuntu detects the system type during the installation and creates a bootable disk partition if required. VirtualBox has Enable EFI option that makes VM work like a real computer, but it’s disabled by default, so Ubuntu does not create a special disk partition and the system will not work on the real PC. That is why it’s required to enable this option in the settings:

Install Ubuntu in the VM. I suggest enabling disk encryption because it helps with data protection that is especially important for portable installations. When the installation is completed perform a software upgrade and install the required hardware drivers. In my case, it’s Nvidia drivers.
sudo apt update
sudo apt upgrade
sudo apt install nvidia-driver-460
Any additional software, like an image editor or instant messengers, can be installed now or later.
So, that’s all: restart the computer, select bootable disk and use portable Ubuntu installation.